3D Printed Lamp
I've just moved into a brand new house with my girlfriend, we're moving things into the house and I've come across a lamp base that we bought from IKEA. The lamp suited the small space it was in previously, but it looked a bit anorexic in our lounge room. I wanted it to be just a little more... "bulky"
This is a CAD render of the lamp base so you have an idea of just how simple this lamp was originally.
This is a CAD render of the lamp base so you have an idea of just how simple this lamp was originally.
 |
| See... VERY simple, a square plate as the base and 12mm shaft as the 'stem'. I decided to jazz it up a bit by adding to it somehow. I have a 3D printer at my disposal so, why not use that to do something interesting! (I've wanted a nice big project to test it out on too!) |
Designing:
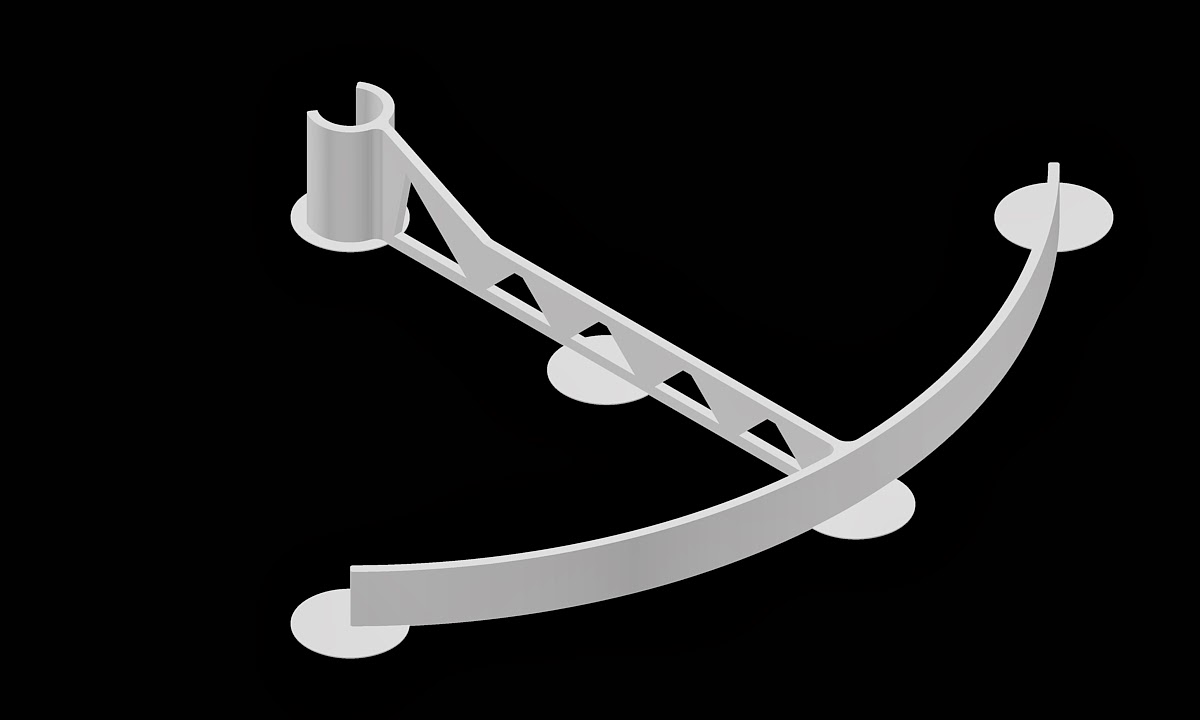
The printer I have is not large at all. It's great for parts that fit into its 200mm x 200mm x 100mm build volume, but this lamp is at least 1.2m high. The only way to 3D print something this size would be to make it in sections. I measured the lamp bases 'stem' with callipers and found it was 12mm diameter. I decided each segment of my design should 'clip' onto the stem. This seemed easiest. I sat down and sketched out a few ideas and came up with this design which I created in AutoCAD (note that I have added circular pads on the bottom which you can see in the pic below, these assist with printing and simply snap off later).
My idea is that I will have many of these clipped onto the stem in succession, and that I can then rotate each one slightly more than the last so that they sort of 'screw' up in a helix around the lamp base... or I could just have a straight vertical strip or a zig-zag pattern, or just randomly arrange them! I think it could look neat! I was confident it would turn out good, and so after designing it I decided I didn't need to do a final render of the entire lamp, I would just go ahead and see how it turned out! At least print a few segments and see how they looked.
 |
| "You know they got in trouble for the 3D printed gun right? You can't go making crossbows..." - My Brother |
My idea is that I will have many of these clipped onto the stem in succession, and that I can then rotate each one slightly more than the last so that they sort of 'screw' up in a helix around the lamp base... or I could just have a straight vertical strip or a zig-zag pattern, or just randomly arrange them! I think it could look neat! I was confident it would turn out good, and so after designing it I decided I didn't need to do a final render of the entire lamp, I would just go ahead and see how it turned out! At least print a few segments and see how they looked.
Preparing the print:
There are 2 main plastics I use for 3D printing, PLA and ABS. PLA is renowned for being very easy to print with, but it also has a lower melting point (a VERY hot day could make a PLA part droop or distort) and it is less flexible than ABS - Since I was after a "snap" fit between each part and the lamp base ABS is in the lead, it will easily stretch that little bit and snap onto the base. It is also plausable that the lamp would get a bit warm both in use and from hot sun coming in a nearby window, so ABS was chosen for this project.
ABS DOES have some caveats though, it tends to contract as it cools, which in turn can make it 'curl up' and become un-stuck from the build platform. This results in errors in the finished part or completely failed prints. I incorporated the circular pads on the bottom to overcome this - the pads give the part more surface area and act like suction cups or wads of Blu-Tack that hold the part to the build plate and resist the warping that naturally occurs.
There are 2 programs I prefer to use for 'slicing' the 3D models and preparing them for printing. One is named Kisslicer and is my go-to slicer. It is VERY fast, easy to use, and gives the highest quality printed parts. Printing with Kisslicer is also usually completed quicker and the machine is smoother / quiter due to its intelligent path generation. Slic3r is a good backup tool - I will ALWAYS use Kisslicer first, but if Kisslicer has problems or the part requires some really fine-tuned tweaking to work, Slic3r will often do the job. Slic3r also has a 'brim' feature which automatically inserts a brim (like a top-hat brim) around the bottom of the part which has the same effect as the circular-pads I added to aid printing.
I decided on black material, made the first part and noticed that it was a really easy print, without much detail and big long lines / curves. I could run it a bit faster and sped the time up from around 42 minutes to just under 30 minutes per part. Before starting the second part though I snapped the circular pads off the first part and went to check how it fit on the lamp base.
ABS DOES have some caveats though, it tends to contract as it cools, which in turn can make it 'curl up' and become un-stuck from the build platform. This results in errors in the finished part or completely failed prints. I incorporated the circular pads on the bottom to overcome this - the pads give the part more surface area and act like suction cups or wads of Blu-Tack that hold the part to the build plate and resist the warping that naturally occurs.
There are 2 programs I prefer to use for 'slicing' the 3D models and preparing them for printing. One is named Kisslicer and is my go-to slicer. It is VERY fast, easy to use, and gives the highest quality printed parts. Printing with Kisslicer is also usually completed quicker and the machine is smoother / quiter due to its intelligent path generation. Slic3r is a good backup tool - I will ALWAYS use Kisslicer first, but if Kisslicer has problems or the part requires some really fine-tuned tweaking to work, Slic3r will often do the job. Slic3r also has a 'brim' feature which automatically inserts a brim (like a top-hat brim) around the bottom of the part which has the same effect as the circular-pads I added to aid printing.
 |
| Kisslicer showing the first 'slice' or 'layer' that will be printed. |
Results:
 |
| Snaps on perfectly! |
Great! So I continued printing and got into a 30 minute routine, I would go into the printing room, remove the freshly printed part and begin printing the next. After I had printed a few more pieces I tested out my design to get an idea of how the finished product would look.
 |
| I didn't realise how dark this picture was! Might have to squint! |
It looks... ok? yeah.... I think? Maybe?
I really wasn't sure at this stage! But continued anyway - and as time went on it looked better and better. Here are a few pics while it was still not quite finished, but I was trying different configurations to come up with my favourite.


After trying different variations of twists, zig-zags and random configurations (changing a few times a day for a week or so) we decided that a nice gradual helix was most appealing. I also decided the 2 lamp shades I have are ugly on this now, so, I will either get a plain white cylindrical lampshade the same diameter as the lamp base segments, OR 3D print a lamp shade continuing the design of the base up around the bulb (perhaps in white plastic instead of black). When I decide I will update the post with pics!
From concept to reality:
My 3D Printed Ikea Lamp Upgrade!
My 3D Printed Ikea Lamp Upgrade!

No comments:
Post a Comment